2013-03-06 Hatch Mania–A Race Against The Calendar

All of our hatches have crazing in the lens and the though only one had a real leak this is likely the last winter under shrink wrap for a while so if hatches are to be pulled and rebuilt this was the year and the best time to do it. The trick is to get all the hatches removed, repaired and re-installed before the shrink wrap comes off! Being a complete “newb” I started small and worked my way up.

I removed all the screws and then used a flexible paint scraper to slide between frame and cabin top. I was able to slowly work my way around the caulk gasket. The further I worked around the hatch the quicker it went.

2013_03_03_12_34_54_AWB-009

I then used my Porter-Cable Multi-Tool (thank you SO MUCH Jack Tennar!) with scraper blade attached to removed most of the old caulk. Using a industrial grade green scratchy pad from Home Depot I had the mounting frame cleaned up in no time.

2013_03_03_12_53_10_AWB-010

Unfortunately I do not have any pictures of cleaning the actual hatch frames but I used a narrow paint scraper to get off the big chunks and the a Wirebrush on my drill that cleaned the frame ups really nice.

Am currently running the hatches through Select Plastics in batches of 2-3. I ship them and they are returned with a new lens installed along with all new gaskets as well. We are using Butyl Tape rather than LifeCaulk. The cost is more but the ease of use is amazing. It is probably just me but if I get neat LifeCaulk the stuff ends up EVERYWHERE! I am just hoping in the end Butyl Tape is everything it is claimed to be!

We used 3 layers of tape around the base and wrapped a small amount around the screws just below the head of the screw. I found that it was best to drive a hole through the tape prior to placing the screw and allowing the screw to make the hole. Using the screw to puncture the tape deformed the tape more than I liked.

2013_03_02_13_19_50_AWB-003

Now we just have to wait for the shrink wrap to come off and that first rain storm for the leak test! Wish us luck!

2012-02-09 Jack’s Work Is Done For Now (Part IV)

Well Jack completed the last of his current assignment today with the installation of the tank/bladder vent. Jack used a 1 1/2 inch vent line out of the bladder downsizing to 1 inch once the line passed through the bulkhead into the lazarette. Yes, the clamps are arranged like that on purpose, I am wanted to make sure nothing sharp was near the bladder tank!

20130209_121747

The vent passes into the lazarette and to the downsized 1 inch vent line. I used plenty of thread sealer. Last thing you want is a Black Water leak! (Note: Need to give the lazarette a good cleaning!) I am going to make a protective cover for the fitting to make sure a heavy anchor or other object does not strike it.

20130209_102240

Here is a picture with “protective” cover in place. I used a 4 inch piece of PVC. Cut off one side of the pipe and used some aluminum strap material to attach to the bulkhead. Its on there pretty good but still need to be careful with spare anchor!

20130216_105747

The vent line finally exits the stern. The larger vent line was used so that it could it could easily be flushed at with a fresh water hose.

20130209_094842

2013-02-03 Jack’s About Done?? (Part III)

Anyone who has “head” on their boat knows, Jack is never really done!!! Lets just say this particular project is nearly complete…for now.  “Jack” last left us with all the plumbing, pumps and valves installed. The remaining tasks are to add a vent fitting to the waste tank (yea it never had one) install the tank and plumb the vent to the outside.

20130202_104933

The tank vent line will exit the tank locker into the after lazarrette (which is Magnolias huge trunk) and then out to the stern.

20130202_113416

I installed a double threaded bulk-head fitting so hose fittings could be fitted and maintain the bulkhead’s water tight integrity.

20130202_124808

After cutting the bulkhead into the lazarette it was time to cut the hole from the stern into the lazarette. This is the one that made me nervous since I had to cut through the hull and was afraid the gel coat would chip. I used plenty of tape on the gel coat and a tungsten tipped hole cutter.  

20130202_125127

As can be seen the everything worked just fine. I used another bulkhead fitting here so we could easily flush the vent with a garden hose as required. Still have to reposition that starboard vent!

20130202_123022

While I was spending quality time in the lazarette I installed some hooks to hang our emergency anchor rode. The hooks started life as Harbor Freight ladder hanging hooks. My hacksaw and I modified them just so!

20130203_105139

Annette and I installed and additional fitting that will be used as a vent. I still need to finish plumbing the vent line but that will be next weekend when “hopefully” it is a bit warmer.

2013-01-07 — The Tale Of Black-Water Jack (Part II)

Tunnel Vision is a dangerous thing. Not living aboard gives us plenty of time to visualize how something is going to work. I spend days before getting to the boat making diagrams and “imagining” how a cable, wire or in this case a hose is going to be routed. Sometimes having it worked out  in your brain before hand can be a determent. Take the below example. Before I installed one valve or hose I “knew” how it was all going to go together. As you can see hose is bent this way and that way and routed here and there, all because I “knew” how it was going together. Granted the moment I looked at the below I was not happy, but it was right all because that is how I “knew” it would go together.

20121229_133742

Capture1

After a week away from the boat I came back and realized immediately if I swap the connections on the Y-Valve and slightly adjusted the mounting of the valves I would have a much much cleaner installation with less hose and less bend in the hose. So much happier I was finally able to get my eyes outside the tunnel! Below you can see the same re-configured cabinet!

20130105_130515

Granted the functionality of the system did not change at all but I wanted to try and align the functional drawing a little better to the physical so that when I am old and grey I have half hope of understanding how this thing is suppose to work.

Capture2

With Annette’s help we pulled the remainder of the hoses and installed the sanitation pump that will be used to empty the bladder/tank.

20130105_130448

Below is the freshly sealed and painted tank locker. Part III will be installation of the vent fitting planned for the back of tank locker.

20130105_130454

2012-12-30 — Black-Water Jack Does Windows Too!

We had to order sanitation hose so that left today open to take on another project that has been waiting in the wings. Hatch restoration. Sailboats are notoriously dark so as much light as you can get “down-below” is all the better. The “windows” in the hatches are made out of plastic and after some years they become crazed and look unsightly. In addition the gaskets wear out eventually as well. We have old Lewmar Rollstop Hatches which they only made for 4 years so that should tell you something! They are what we have and because of their unique sizes it is not economical to replace them. That said the best we can do is have them rebuilt by the experts at Select Plastics. 

All things considered this is the perfect time to have the work down in that the boat deck is completely covered by the shrink wrap. On a sunny day like today it makes it completely comfortable to work on deck even when like today the temperatures were in the mid 30s and wind was gusting in the 30-35 knt range! The whole time I was working in shirt sleeves!!

20121230_105324

I previously made an emergency hatch cover for each of two sizes of hatches. (2 & 4) In case of heavy weather and a hatch failure we would be able to prevent a huge amount of water from entering the boat. In addition I made them with carriage bolts only being exposed do they would provide some level of security if I needed to use them in non-emergency situations such as this. I should have take a picture from below but there are basically oak cross members cross the hatch frame below with wing nuts holding the carriage bolts.

20121230_125333

20121230_105509

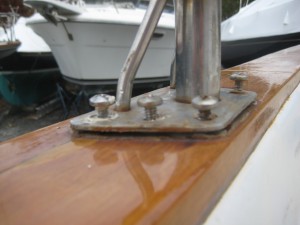
After taking the all screws surrounding the frame of the hatch it was a relatively simple matter to separate the frame from the deck suing a Plastic/Rubber tipped hammer and paint scraper with a sharpened edge. BTW – If you do not have one of these hammers, go get one now. My buddy Greg Rodgers turned me on to this one and it is no much better than a standard hammer on a boat. This hammer has saved me from inflicting real damage on Magnolia so many times!!!

20121230_110204

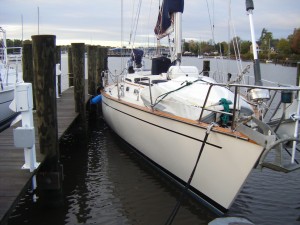
Here is the aft hatch removed and all battened down with the emergency hatch cover. I will have to add a picture of below but the underside has cross members just like the top which makes for a very solid installation. (1/2 inch plywood and oak cross members all with a coat of 2 part epoxy)

20121230_125847

2012-12-29 — The Tale Of Black-Water Jack (Part I)

I keep hearing you are never quite become “one with your boat” until until you wade (figuratively speaking) into your Black-Water System.

Most boats have a potable water (drinking), grey waste water (sink drains) and of course black-water. You can guess source of the later I am sure! The laws for sewage disposal are pretty straight forward. When inland/shore water disposal is in a tank and when you get into port you use a big vacuum device to empty said tank. When you are in the ocean though (3 miles or more off shore) you discharge directly to the ocean or you can empty your tank into the ocean.  The later part of the statement is where we meet Magnolia. She has a tank of course and the ability be vacuumed at the dock but was not equipped to empty her tank at sea. This becomes a particularly important capability in the Bahamas since they don’t have pump facilities. (I understand “some” marinas are being equipped.) The only way to dispose of black-water there is off shore in the ocean. This calls for Magnolia’s current system to modified with the addition of 2 valves and a pump to empty the tank. This project will add a “Overboard Selector Valve” and a “Tank Discharge Selector Valve” along with the “Pump” which will be a Whale brand Manual Sanitation Pump designed exactly for this purpose.

Capture

First is to remove the 1 1/2”  “Tank” and “Overboard” hoses from existing valve.

2012_12_16_19_21_27_AWB-046

Select the location for the “Overboard” selector valve.

2012_12_16_19_21_10_AWB-047

I used West System two part epoxy to attach mounting block to the hull interior. The manual described the consistency to be like peanut butter. Obviously my first batch was a little on the runny side of peanut butter.  I got it right the second time though!

2012_12_16_18_29_03_AWB-062

After a little clean up, a count of primer and coat of paint nearly ready to go here. Well except for a last minute decision to replace the hose connected to the deck fitting, so one more to pull out then we really are ready to go.

20121229_095641

The pump and “tank discharge selector valve” will be mounted on the stringer just aft of the rudder post so we will need to add an access hatch there. (Note: I don’t recall if Grandpa Emerson or Dad gave me that jig-saw but I suspect its as old as I am and twice tough!)

2012_12_16_18_29_13_AWB-064

I also took the opportunity to give the tank/bladder locker a coat of 2-part epoxy to make sure things were really sealed up in case of leaks!

2012_12_16_18_29_08_AWB-063

With all the old hoses removed and compartments freshly painted next we will start putting it all back together next weekend!

2012-12-05 Davits – Stanchions – Lifelines & Blog Changes

Please let me interrupt the planned article for a quick PSA (Public Service Announcement). We have relocated the Magnolia and Seamless Sailor Blogs so you might notice a some small changes. In addition Magnolia now has her own Facebook Page (of course she would Smile) which you can subscribe to. That concludes the PSA, thank you for your attention!

This project started out as a simple Lifeline replacement and toss in re-bedding a couple of stanchions and davit mounts. No big deal right? Yes and then enters “Scope Creep” (Hear the organ music from Phantom of the Opera?) “Scope Creep, what the heck is that?” Scope Creep occurs when a project gets bigger than its initial plan. In the case of this project it was found that each stanchion was mounted differently. Some had threaded backing plates, some had no backing plates and some were not even through bolted!

In the case of the davit mounts the through bolts had some little wimpy washers that were deforming from the load. Before you get on me about the stainless next to aluminum ignore that. I am taking on some risk of bi-metallic corrosion but I am aware and will monitor. Since this is a DIY (Do It Yourself) project I opted to get some aluminum stock from Home Depot of various widths so I could use the widest possible for each individual instance. Believe when I say these pictures were the easiest thing to do with these plates. These things were a bear to get to even after a couple of small interior modifications! At least now they can be observed unlike they had been for the first 2o years of boat life and much better maintained in the future. My buddy Greg taught me, “if you take something apart on a boat, make sure you can take it apart a second time cause at some point you are going to have too!” With the davits more secure it was time to move on to the stanchions.

001 003

The original plan was to remove the Port Gate Fwd Stanchion and Port Stanchion #3 and simply epoxy a crack in the teal cap rail, re-bed the hardware and be done. Unfortunately we were unsatisfied with method used to secure the gate stanchion so we decided we better remove all of them. As the chart below indicates we still have some data to gather but at least we will where stand and where we need to add plates and devise additional access below decks. When we get the stanchions and lifelines re-installed in the spring we will know everything will be installed as securely as possible. Capture

2012-11-19 — Maintenance & Magnolia Spends Time with Hawk

Ok, perhaps we are not at Crunch Time yet…..but I can see it from here! As the calendar counts down I can feel the first inklings of dead-line anxiety! We hauled (pulled out of the water) Magnolia a little early this year because we wanted to address some deck issues namely lifelines, lifeline stanchions and some less than perfect teak work.

We removed the lifelines and will fabricate new ones over the winter. The lifelines in conjunction with the stanchions are the last line of defense to stay aboard Magnolia in the midst of an unfortunate accident. I joke that the only rule on Magnolia is to stay on the boat and those lifelines are your last shot! The lifelines are made up of stainless steel cable, some are coated in a plastic sheath others are left bare. Coated or uncoated is a religious question and this blog does not address religion or politics so that is discussion for another blog.

012

Stanchions though, well there is no debate there. They need to be securely as possible attached to the boat. The best way to do this is called thru-bolting, where a bolt is passed through the stanchion plate, through the deck, through a metal plate under the deck and finally having washer and nut added with sufficient bedding compound (caulk) to make it all water proof.

010

As can be seen, of the three screws only the middle screw is a thru-bolt while the outer screws simply penetrate the teak cap rail. The preference would be that all 6 were thru-bolts (3 on each side). We at least have the two and frankly we will take that. Sadly at some point in the past the stanchions were removed the nuts and washers were never replaced on the thru-bolts. MAJOR safely foul there. Even worse I had a piece of teak replaced last year and the gentlemen that did the work (a “Maritime Industry Professional”) used 6 wood screws not even attempting to thru-bolt the stanchion. That was a DOUBLE MAJOR safely foul. He endangered us and everyone who sailed on Magnolia and will never get near another boat of ours as long as I live!  I will stop now but check with me before you have work done by a yard in the West River area.

The picture above looks pretty “poopy” but actually things will be looking MUCH better after a little cleaning, polishing and sanding. More importantly once Annette and I get the stanchions re-installed with proper thru-bolts and backing plates we will be MUCH safer too!

As soon as we get the deck chores done we will have the shrink wrap applied and move onto our below deck chores. The first one, Sewage System Improvements! REALLY excited to get into that one!

On the lighter side most people know how much Annette & I consider ourselves amateurs regarding our sail boat undertaking. We have come huge distances because of our mentors who have given SO MUCH of their time and from books of experienced authors that we consider our text books. Nigel Calder, Beth Lenard, Lin Pardey and the writings of Greg Rodgers are among the writings we keep close at hand. As luck would have it on my first visit to Magnolia since being hauled I saw an unusual but familiar hull shape right next to us. A quick view of her transom confirmed it was “S/V Hawk”, the boat sailed by Beth Lenard and her husband Evans Starzinger.

20121110_081948

Obviously I am referring to the boat behind the trailer boat! Hawk has sailed all over the world and even around Cape Horn which is scary just thinking about it. I have a included a link to their travels here: http://www.bethandevans.com/map_voyage.htm.

Beth & Evans were working on Hawk as Annette and I were on Magnolia. We had to  introduced ourselves! They asked about Magnolia and complemented how great she looks for 22 years old! Our mentors Greg & Marie aboard Second Sally were anchorage mates with Hawk during last year during hurricane Irene. Beth & Evans were very kind and also quite interested on how we got to where we are in regards to training and such. I will add a link to Hawk as well. http://www.bethandevans.com/hawk.htm

I am sure you will be looking forward to that article on Sewage Systems so just be patient!

Be Safe, Anthony & Annette

2012-11-01 Hurricane Sandy

Magnolia has been extremely blessed when it comes to Hurricanes! Last year Magnolia and I weathered Irene together but this year with Sandy things were different. Sandy was expected to be much worse and with the Irene experience I learned once the storm showed up, well there is little you can do. THE HURRICANE GAME IS WON OR LOST BEFORE THE STORM SHOWS UP! It is clearly all in the preparations. My parents were in town to visit my niece on Friday night so first thing on Saturday Annette and I got right to work by removing the head-sail, top side canvas and stowing the dinghy on the forward deck lashed down.  I returned to Magnolia on Sunday to take one more look around and double checking all was secure. Even a day and half before Sandy’s arrival the atmosphere was turbulent!

Sandy thankfully came ashore (Cape May, NJ) well north of our location at Galesville, MD. This meant that rather than having water pushed into the Chesapeake Bay at the same time we had the strongest winds the water would actually be “sucked” out. Notes: It’s a WHOLE lot easier to deal with too little than too much water, particularly when the wind is blowing 80-100mph! Once the storm had passed that’s when our high water conditions came to be with the water being “pushed in” by the strong southerly winds. We left the mooring lines a little long and Magnolia rode through just fine. Our friend Wes went to check on the boats and was kind enough to send us some “proof of life” photos. Over night the water was somewhere between 18-24 inches ABOVE the dock deck.

DSCF0034


2012-10-14 Fall Cruise #5

On Saturday Jack & Kathy Tennar along with Neil & Merle Brown drove down from New Jersey for a weekend visit. Below is me, Jack & Neil “doing our man look”

012

Kathy, Merle & Annette enjoy an afternoon of browsing the small shops that line the lovely downtown area.

001

Below we were able to observe a large Car Carrier transit the canal

002

003

 As quickly as the weekend started it ended and it was time to start heading for home. We did not have the best weather for our trip home. The forecast called for 18-22 knts of wind coming directly from the south which is the direction needed to go. We secured the boat the best we could and off we went. We split the 75 mile trip into two days but they were certainly long ones!

We did get to spend one more night in the lovely anchorage at Worton Creek which made the long haul worth while!

A more detailed map of our complete trip is available at: Magnolia Map