While in George Town, Exuma the Captain attended a beach seminar on batteries and energy power for the boat. A lot of cruisers attended and the seminar created a lot of buzz. By the time we arrived George Town we hadn’t been in a marina for several weeks. Not a big deal, saved us money and no docking “events.” You get the drill, but not being in a marina also means our battery bank had not been “topped up” via shore power – ugh. So the discussion at the seminar was all about how to “love” on your batteries. Maintaining them is important. Not that I can technically explain it, but over time you need to fully charge the batteries and the last percentage is the hardest to add. The Captain came back from the beach discussion pumped about ways to address topping up the batteries when we are living on the hook for longer periods – flexible solar panels seemed the most likely for us. Interesting…and expensive.
So what does this have to do with sewing aboard? Solar panels need a place to live on the boat that is, as you guessed, in the sun. Which pretty much leaves the top of the bimini for Magnolia. You may recall that our bimini is new as of spring 2013. How would the solar panels be attached to the bimini? The Captain reviewed this website which has a good description of how to attach them with a Velcro option (details here). Yes, I could do that. You could also zipper them on, use grommets or really sticky tape. But the cost of the solar panels themselves is pretty high. The decision for us is on hold as there are a few other projects ahead of this. And by the time we buy the solar panels– they are the same cost as a new set of batteries, hence the delay and conundrum for us.
On our way north we met up with our friends on S/V Journey and those handy folks, Drena and JR, had installed the flexible solar panels! So interesting to see how they did it. JR, the engineer, designed most of the install following the directions we had been considering and Drena, a talented Seamless Sailor and Monkey’s Fist contributor, created the Velcro installation out of Sunbrella. Drena posted on her website about making the Velcro lapels to attach them to the bimini with great pictures and tips. She offered to share her post on Seamless Sailor. Thanks, Drena!
Sewing 101: Mounting Our Semi-Flexible Solar Panels
(Guest Post provided by Drena Galarza – S/V Journey)
Anybody who knows JR or has been reading this blog for a while, knows how particular he is about things. Sometimes I want to strangle him because he takes forever to make a decision but in most cases, I’m thankful for his “precision.” When we decided to go with the semi-flexible solar panels, JR wanted the mounting to look “finished.” We knew that sewing industrial Velcro on the bimini and dodger and sticking it to the underside of the panel would do the trick, but he wanted it to look a little more custom. He did a bunch of internet research and found these two sites that had examples of “lapels” that held the panels in place and provided “cable management” as our dear friend Mitchell called it 🙂 Also note, we did not use Solbian panels, we used cheaper ones from Discount Solar 🙂
One of JR’s favorite sites, this dude is as “precise” as it gets: http://www.pbase.com/mainecruising/solbian_solar_panel
This site has a few good pics, and a great little drawing at the end to help with measurements: http://www.bruceschwab.com/uploads/solbian-to-canvas-guidelines.pdf
As with most great ideas, ours was stolen! Inspired by the sites we had found, we sketched up something that we thought would work for us and I made a little template to get sizes and seam allowances and stuff just right. Notice the staples! I went with a 4” width (½” seam allowance on the front, 1 ¼” fold over for cables and ½” strip of Velcro on top, and that left 2 ¼” for the underside which included 1” of Velcro and stitching). I figured I’d cut a bunch of strips as long as possible and customize the length as needed per panel.

Our design process. JR is holding the model for the lapel, complete with seam allowances and hems.
Thankfully, the previous owners of Journey gave us some extra Sunbrella that matched our canvas and it was just enough to get the job done. I wanted a hot knife to make canvas cutting a little cleaner but I don’t have one! Another benefit of being in Vero Beach is the corkboard in the lounge. People post parties, and excursions, sign-up sheets, and notices, so I posted a note asking to borrow a hot knife. Within a day the lovely folks from Kintala came through for me 🙂

The awesome hot knife (I kinda’ need one) and the canvas all marked up. I used the tile as my straight edge because my only big ruler is plastic! Why do we have a tile on board? That’s another post!
Hot knife in hand, measurements made, I got to work cutting rectangles! Once finished, I took them to the lounge and ironed in all of my seams. I was quite a spectacle ironing in the lounge! Doesn’t everyone go to the marina lounge to iron!? Geez!

Me, ironing in the lounge 🙂
While is was cutting and ironing, JR had time to think about placement and was soon able to give me measurements for length. Before I started sewing, I cut the strips to length, keeping in mind a ½” seam allowance on either side. Then I sewed it all up!

A close up of the lapels all sewed up!
Once all of that mess was done, it was time to stick Velcro. Sticking Velcro at Velcro Beach was so silly! We took a 2” strip of industrial Velcro and cut it into ½” strips for the top of the panel (see above) and 1” strips for the bottom. We did all of the Velcro sticking at once and put all of the lapels on the panels because we figured they’d be easier to work with and place on the bimini and dodger. (Click for full pic!)


JR had already outlined in tailor’s chalk (gracias Tia!) where the panels should sit on the bimini and dodger and which direction (for cable management, of course!). First he did it with no lapels (actual size of the panels) then he did it with the lapels on (about a ¾” larger all around) that way we had a good idea of where the panels lived once we took the bimini and dodger off!

JR outlining the panels with the lapels on. You can see the lines of just the panels alone in the foreground of the pic.
We started with the bimini, so we took it off and brought it in. Remember, our boat is compact, so it was interesting working with that giant piece of canvas inside the boat, but we worked it out. We did one panel at a time (there are 4 on the bimini, 2 on the dodger), first putting basting tape inside the chalk outline to help the lapels stick (the basting tape was VERY helpful, by the way) then we unstuck the bottom Velcro and laid the whole thing in place. We pushed down the perimeter and made sure all of our sticky stuff was sticking and then took the panel off. With the panel gone, we were able to run the bimini and lapels through the sewing machine. I used a regular stitch, about 5.5 for the stitch width, a little extra tension for the sake of the canvas and put a stitch on either side of the Velcro. It wasn’t terrible. We repeated these steps with the other 5 panels. The bimini was a cinch, the dodger was a beast, mainly because of the inflexible strataglass.

Lapels stuck, panel off, ready to run through the machine!
I have to give props to my little sewing machine. A year ago, I didn’t know what a bobbin was, literally. I also didn’t know how much of a workhorse this machine is. It belonged to JR’s mom who passed away 2 years ago. When we were tasked with the heartbreaking job of clearing out her house, we decided to take it hoping it would come in handy and hoping we could find some of the joy it brought to her. Boy has it. I think she would be really pleased knowing that her machine has contributed to our boat’s beauty and functionality. She may not be too happy when I slip 4 layers of canvas through it, but I know she’s glad we’re using it. Anyway, it really came through for us this time around.

JR and his beautiful mom, Leslie (Solomons Island, MD, 2010)
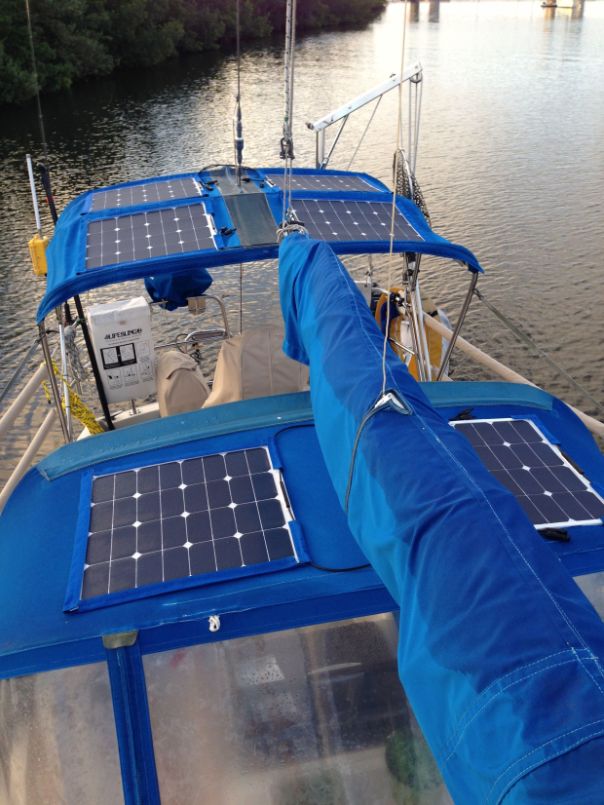
And that’s about it! Here are some pics of the finished install. JR doesn’t have it up and running yet, we need another Home Depot run, so all of the wires and stuff aren’t there, but this is pretty much what it looks like. We are both really pleased with the outcome, and although it was a bigger project than we had anticipated (aren’t they all!) it was well worth it.

Panels all snug in their lapels on the bimini.

A shot of all 6 of the panels! El fin!
It wasn’t all smooth sailing! Here are a couple of things we learned:
- Basting tape is the bomb. If I didn’t have the luxury of ironing, I would have used basting tape for all of the hems.
- Canvas is thick, factor that into your measurements. Newbie mistake I’m sure, but if you’re giving yourself a ½” seam allowance and you’re using a thick fabric like canvas, give yourself a little extra. Those folds take up some of your material!
- Use tailor’s chalk. By the end, we were chalk marking all sorts of stuff. When we were taking off the panel, we would lose a Velcro or two, so we started chalking where the Velcro lived before it got peeled off. Chalk it up, man. It’ll come off eventually and save you a little sanity.
- Make it custom. If you’re going through all this trouble, make it really custom to your boat. JR thought through all of his wiring and connectors before I did any cutting. That way we knew where we needed gaps in the lapels.
- Streamline. Try to streamline the process and make things consistent. Then you’re not wasting time doing things one at a time. Once everything was thought through, JR gave me a list that said 8 (lapels) – 20 7/8” and 4 (lapels) – 22 9/16” (yes, he used 16ths of an inch!), etc. Having consistency meant faster production! We also used certain measurements when placing the Velcro on the bottom of the panels. That way, if one peeled off, we knew about where it lived…
- Clear out your space if you’re working on a boat! A messy, squishy boat gets frustrating fast! Tidy up your workspace and try to make it as orderly as possible to cut down on your frustration.
Magnolia’s Solar Saga continues here and here.
Resources:
–There is a picture in this Cruiser’s Forum thread that shows the panels sewn onto a canvas backing and border that allows for grommets to be installed at the corners.
—SailNet Forum thread on a canvas maker adding the lapels to the bimimi for attachment.
—Stella Blue took a slightly different approach to adding flexible panels to the Bimini.
–This bike enthusiast sewed a solar panel to a tent pole frame to carry it on his bike! (And in the picture he is using the same sewing machine I learned to sew on.)
Other resources or ideas for solar panels and installations? Leave a comment.